Beginners in beetle breeding: Cetoniinae or flower chafers
In this post I will try to give all information needed to start and maintain your own breeding groups. Since there is a lot of things you need to know, this will be a long read. During reading you must keep in mind that this are my recommendations for some easy beginner species. For some more advanced species it is often needed to take different measures. Also there are many different breeding techniques, of which I only discuss the most accesible/easy ones.
This text will contain the following sections:
1) Obtaining larvae or beetles
2) Life cycle
2.1) Eggs
2.2) Larvae
2.2) Larvae
2.3) Pupation
2.4) Adult stage or imago
2.4) Adult stage or imago
3) Substrate
Each section will end with an short list of do's and don'ts. For easy navigation within the text, use the search function (ctrl + f) and type the title of the section as listed above. Here we go!
1) Obtaining larvae or beetles:
A first step will be to purchase yourself some larvae or beetles. It is most rewarding when your project yields some good results, therefore it is advised to start of with some relatively easy species.
Some of the easiest species commonly found in Europe are the following African species: Cyprolais hornimanni, Cyprolais aurata, Pachnoda aemula, Pachnoda sinuata and most species of the genus Chlorocala. Also some European species are easy to breed. They will be discussed in a different post.
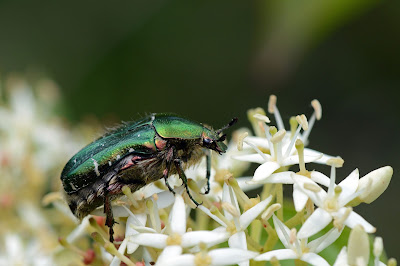
 |
| Pachnoda aemula (before taking off) |
 |
| A small male (left) and a female (right) of Cyprolais hornimanni |
If looking for some of these I would recommend searching on a second-hand website, or asking on facebook groups. There are often other amateur breeders offering some of their excess stock. Another way to do this is to go to a (terrarium-oriented) fair. In most cases larvae can be bought there. You can also contact me by mail if you would be looking for larvae or beetles (via domienvandijck@gmail.com).
A second possibility is purchasing them via an official retailer. Prices via these organisations tend to be higher compared to those of fellow hobbyist. Some recommended websites are the following:
As a breeder I find it very important to breed in big populations (to avoid too much incest and genetical funnels). Since adults are usually exponentially more expensive than larvae, I mostly buy lots of larvae. The plus side of this is that you are in control of the rearing process and in this way you are more in control of the longevity and quality of the adult beetle. The downside of this is that the larvae will need several months to develop, so as a starter it might feel more exciting when buying adult beetles right away. Many beetles have rather short lives as an adult. When you buy adults it is always uncertain how long a beetle has been out of its pupal cell. Always inform about the age of the beetles.
Do and don'ts
-When buying larvae: better opt for younger stage larvae (L1-L2)
- Buy multiple larvae so you enlarge your chances of ending up with adults of both sexes.
-When buying adults: Ask when the animals hatched. Always opt for freshly hatched adults.
- Make sure temperatures are above 15°C when shipping, or ask the dealer to use a heatpack.
- Make sure temperatures are above 15°C when shipping, or ask the dealer to use a heatpack.
- Never pay by Western Union. Use payal, this way you can opt for insurance.
2) Life cycle
Beetles (Coleoptera) belong to the insect group of Endopterygota. That means that they go from a larval stage through a pupation to a winged adult. Butterflies are another example of an insect order within this group. Witnessing this cycle (especially for the first time) is very exciting. However, each stage requiers some different points of attention. If these are not met, chances are real that your breeding and/or rearing will not be succesful. Almost all beginners end up having losses during their breedingcycle. Most of these losses can be avoided if some easy measures are taken in each phase of development. The full cycle will now be explained:
Eggs are white when they get deposited by the female. As they mature they turn to a more yellow color. In nearly hatching eggs you ca see a tiny larvae through the shell of the egg.
For the easy species described earlier on, the time it takes for eggs to develop varries between 2 and 5 weeks depending on the temperature.
2.2) Larvae
Out of the eggs a small larvae emerges. This is called the L1 larva. An L1 larva will eat substrate for a couple of weeks and then shed it's skin. After the shedding, the larvae is a bit bigger and has a bigger head capsule. The larvae is now an L2. This process repeats itself again after two or three months. After this last shed the larva is an L3. The L3 stage is the stage which lasts the longest, up to 5-6 months.
For smaller species you can put up to 15 larvae in a 5 liter rearing container. Change the substrate if you notice that there are a lot of frasspellets in the substrate. The older a larva, the more it can eat. In later stages substrate changes should be more frequent as they run out of substrate faster. If you don't want to change substrate often, it is a possibility to use even bigger rearing containers. Larvae kept in large rearing containers tend to become bigger and heavier than those living in crowded and/or small breeding boxes.
During the larval stage it is advised to check on the larvae once in a while. You can check whether they have sufficient substrate to eat and whether or not they are in good health. Notice that taking a larva out of the substrate is a stressful event for the animal, and can compromise growth if it happens too often. It is advised to not check larvae when it is not necessary.
At the end of the third instar the larva changes in color, to a creamy yellow color. This is a sign that the larvae is nearing in on pupation. When you notice this, it is recommended to not disturb the larvae for one or two months.
The larval stage is the longest stage in development and is determinative for the quality of the adult beetle. The health and growth of the larvae depends strongly on the quality of the rearing substrate. As the composition of rearing substrate is subject to a lot of discussion and rather complex research, this topic will be discussed in detail in a later blogpost. At the end of this post, the most basic substrate is explained.
When nearing in on pupation the larvae will first eat a large amount of substrate in a short time. after that it will stop eating and wander around through the substrate. They probably do this in order to find a suitable place for pupation. When the larvae feels ready it will start with the construction of a pupal cell. This is a hard "cocoon" made out of a sticky excretion and the substrate, in which the larva/pupa is protected. It is during pupation that mistakes of the breeder most often lead to losses.
In most cases the larva can only try to make the cell once in it's lifetime. If the larva is disturbed during the construction, it will remain wandering around as a larva. Eventually it will die from starvation. When the cell is successfully constructed the larva will remain active inside for some weeks. If the cell is opened then, the larvae will crawl out. Then again the larva will die of starvation, as it is unable to reconstruct a pupal cell. So the key will be not to disturb the larva before/during and for some weeks after the construction of the cell. Train your patience :) !
2.1) Eggs
Adult females deposit eggs in the substrate (which will be discussed later on). For most species, the female compresses substrate together. This way she creates a small pocket in which she deposits a single egg. Females can lay up to 70 eggs in their life, allthough about 30 eggs is the average. The female chooses a spot that to her seems right for the eggs to fully develop. Therefore it is not ideal to disturb the eggs too much. Within the breeding scene eggs are often collected early to avoid them being eaten by larvae. When using a big enough breeding group, this is no necessity. A group of females will lay so many eggs that the very small loss of a couple of eggs doesn't affect the breeding results too much. Therefore I stress again the benefits of big breeding groups.Eggs are white when they get deposited by the female. As they mature they turn to a more yellow color. In nearly hatching eggs you ca see a tiny larvae through the shell of the egg.
For the easy species described earlier on, the time it takes for eggs to develop varries between 2 and 5 weeks depending on the temperature.
Do's and don'ts:
-When a female is laying eggs, don't disturb the substrate frequently.
-When a female is laying eggs, don't disturb the substrate frequently.
- The substrate should be humid but not wet, this can make eggs rot.
 |
| An egg embedded in the substrate. The more yellowish colour suggest it is close to hatching. |
2.2) Larvae
Out of the eggs a small larvae emerges. This is called the L1 larva. An L1 larva will eat substrate for a couple of weeks and then shed it's skin. After the shedding, the larvae is a bit bigger and has a bigger head capsule. The larvae is now an L2. This process repeats itself again after two or three months. After this last shed the larva is an L3. The L3 stage is the stage which lasts the longest, up to 5-6 months.
For smaller species you can put up to 15 larvae in a 5 liter rearing container. Change the substrate if you notice that there are a lot of frasspellets in the substrate. The older a larva, the more it can eat. In later stages substrate changes should be more frequent as they run out of substrate faster. If you don't want to change substrate often, it is a possibility to use even bigger rearing containers. Larvae kept in large rearing containers tend to become bigger and heavier than those living in crowded and/or small breeding boxes.
During the larval stage it is advised to check on the larvae once in a while. You can check whether they have sufficient substrate to eat and whether or not they are in good health. Notice that taking a larva out of the substrate is a stressful event for the animal, and can compromise growth if it happens too often. It is advised to not check larvae when it is not necessary.
 |
| Larvae nearing pupation: the skin has a yellow tone to it. |
At the end of the third instar the larva changes in color, to a creamy yellow color. This is a sign that the larvae is nearing in on pupation. When you notice this, it is recommended to not disturb the larvae for one or two months.
The larval stage is the longest stage in development and is determinative for the quality of the adult beetle. The health and growth of the larvae depends strongly on the quality of the rearing substrate. As the composition of rearing substrate is subject to a lot of discussion and rather complex research, this topic will be discussed in detail in a later blogpost. At the end of this post, the most basic substrate is explained.
Do's and don'ts:
- Check rearing boxes periodically to check if they have sufficient food and are healthy.
- Avoid taking the larvae out of the substrate too frequently.
- Stop controlling the rearing boxes if you notice that the larvae or nearing pupation.
2.3) Pupation When nearing in on pupation the larvae will first eat a large amount of substrate in a short time. after that it will stop eating and wander around through the substrate. They probably do this in order to find a suitable place for pupation. When the larvae feels ready it will start with the construction of a pupal cell. This is a hard "cocoon" made out of a sticky excretion and the substrate, in which the larva/pupa is protected. It is during pupation that mistakes of the breeder most often lead to losses.
In most cases the larva can only try to make the cell once in it's lifetime. If the larva is disturbed during the construction, it will remain wandering around as a larva. Eventually it will die from starvation. When the cell is successfully constructed the larva will remain active inside for some weeks. If the cell is opened then, the larvae will crawl out. Then again the larva will die of starvation, as it is unable to reconstruct a pupal cell. So the key will be not to disturb the larva before/during and for some weeks after the construction of the cell. Train your patience :) !
 |
| A pupal cell of a bigger species, Mecynorhina torquata |
Within the pupal cell, the larva will shed it's skin once again. This time the larvae transforms into a pupa. During the pupation stage the larvae transforms into an adult beetle. For the easy species pupation takes about 2 months. During this period some factors need to be taken into account. First of all you need to know that the pupa is very vulnerable to parasites. Especially earthworms and mites can kill a pupa by eating/sucking on it. This risk can be drastically reduced by reducing the humidity of the substrate, as mites and earthworms are easily dried out. This doesn't mean that the substrate needs 0% humidity. The pupa itself can dehydrate too.
The pupa will transform into an adult beetle and shed it's pupal skin.In this phase too, the animal is very sensitive to disruption. If a transforming beetle is disturbed too much, it won't be able to fold it's wings or elytrae completely and will not live long as an adult.
The same advice as with larvae and eggs also applies to pupae: Do no disturb the pupae if not needed too.
Do's and don'ts:
- Do not open or disturb freshly build cocoons.
- Older pupal cells can be opened to monitor the health of the pupa.
- Opened pupal cells do slightly enhance the risk of malformation or death of a pupa.
- Opened pupal cells do slightly enhance the risk of malformation or death of a pupa.
- Keep the humidity rather low during pupation.
- Try to remove earthworms from the substrate whenever you see them.
- Be patient.
2.4) Adult stage or imago
When transformation within the pupal cell is complete, the beetle will remain in the pupal cell for up to two weeks. The beetle will break then out of it's cell and start looking for food.
Most beetles feed well on banana. Other fruit can be used readily, but citrusfruits
are often not accepted. Pachnoda species also eat vegetables like courgette, brocolli and cucumber. Also fungi like champignon work well on Pachnoda sp.
Using fruit can attract pesky fruitflies. To avoid this beetlebreeders use beetlejelly. This is a sort of jellified fruit juice. Fruit flies can not breed on it. Beetlejelly can be acquired via this Belgian provider: Beetlejelly.eu
The adult beetles can often be seen climbing and flying in the terrarium. They will also be trying to climb the glass enclosure. Doing so they often tumble and fall on their back. The adults will try to use their legs to try and grab onto something in order to get up again. If they don't manage to get up they will get exhausted from trying to get up and eventually die. To avoid this, make sure the top of the breeding box/terrarium has many sticks and pieces of bark on it. This way a tumbled over beetle will always have something to grab onto.
Beetles are true escape artists. If they only find a small space where they fit through they will try it and often succeed. The lid of a breeding box should always be fixed with tape as to prevent them from escaping. They can push unfixed lids out of the way easily.
When a male and female are both well fed they start mating. Some days after the copulation the female can start laying eggs and the cycle starts again. Females will only lay eggs if the substrate is deep enough (at least three times the length of the female) and if temperature is appropriate (above 18°C).
When transformation within the pupal cell is complete, the beetle will remain in the pupal cell for up to two weeks. The beetle will break then out of it's cell and start looking for food.
Most beetles feed well on banana. Other fruit can be used readily, but citrusfruits
are often not accepted. Pachnoda species also eat vegetables like courgette, brocolli and cucumber. Also fungi like champignon work well on Pachnoda sp.
Using fruit can attract pesky fruitflies. To avoid this beetlebreeders use beetlejelly. This is a sort of jellified fruit juice. Fruit flies can not breed on it. Beetlejelly can be acquired via this Belgian provider: Beetlejelly.eu
 |
| Different flavored beetlejellies |
The adult beetles can often be seen climbing and flying in the terrarium. They will also be trying to climb the glass enclosure. Doing so they often tumble and fall on their back. The adults will try to use their legs to try and grab onto something in order to get up again. If they don't manage to get up they will get exhausted from trying to get up and eventually die. To avoid this, make sure the top of the breeding box/terrarium has many sticks and pieces of bark on it. This way a tumbled over beetle will always have something to grab onto.
Beetles are true escape artists. If they only find a small space where they fit through they will try it and often succeed. The lid of a breeding box should always be fixed with tape as to prevent them from escaping. They can push unfixed lids out of the way easily.
When a male and female are both well fed they start mating. Some days after the copulation the female can start laying eggs and the cycle starts again. Females will only lay eggs if the substrate is deep enough (at least three times the length of the female) and if temperature is appropriate (above 18°C).
Do's and don'ts
- Don't force fresh adults to eat. They will eat when they are ready for it.
- Provide plenty of sticks and bark on top of the substrate.
- The depth of the breeding box should be at least 3 times the length of the adult female.
- Use beetlejelly if you wish to avoid fruitflies.
3) Substrate
As mentioned before, the substrate determines the quality of the beetles. For easy species there is no need to use advanced substrate. They feed well on a mixture of dead leafs which are partially decomposed and a small proportion of white rotten wood.
For dead leafs, do not pick the upper layer of the forest floor. The leaves here are often not decomposed and hard for larvae to digest. Use a deeper layer, which consists of partly decomposed leafs.
For dead leafs, do not pick the upper layer of the forest floor. The leaves here are often not decomposed and hard for larvae to digest. Use a deeper layer, which consists of partly decomposed leafs.
White rotten wood is dead wood that is infected by certain lignine decomposing fungi. The wood is soft and has a pale white or yellow color to it. The wood is of the right quality if it can be easily broken into pieces by hand.
For leafs and wood there is one important rule: never use it if there is parts of a coniferous tree to it. Wood and needles of conifers contain high amounts of tanines and other chemical components which make it indigestable and poisonous for beetle larvae.
A last component that can be added to the substrate is spaghnum peat. Spaghnum peat is high in cellulose, keeps the substrate well ventilated and controls the moisture level in the substrate. I highly recommend addig it to the substrate. The product can be purchased in gardencenters and growshops.
All componets should be mixed together. The lowest layer of the substrate should be pressed firmly, as this induces egg laying. Once again, make sure the substrate is humid and not wet.
Having read this, I wish you as a reader the best in your first breeding experience. Feel free to contact me or comment below should you have more questions or remarks about breeding easy species.

Comments